Multi coin selector Setting step
|
|
|
If only one type of coin is set, the following method can be tried. |
|
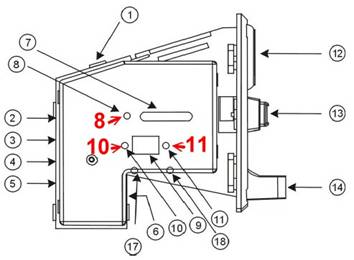
Press the button (8) |
|
The monitor will display (A1) |
|
At this time At this time, insert 15 coins consecutively |
|
Once all the LED lights are displayed, you can insert a coin to test. |
|
Note, not every coin acceptor can be set up this quickly. |
|
If this method cannot be used |
|
The
buttons on both sides of the display (9) are "add button
(10)",
" decrease button (11)" |
|
|
first step:“Change set value step” (xx)=
Picture part number |
|
|
1 |
Start,Simultaneously
press the buttons on both sides (10, 11)of the display (9) |
|
2 |
Until
the "A" is displayed, then press the "Display (9)" above,
"LED (7)" button on the left (8) |
|
3 |
[E] [How many inputs should be entered
when several coins are to be put in], (If only one coin is set, E is set to 2
here) |
| Note: |
If
【E】
is set, 【P】
(output pulse count) will be displayed. This mode does not require setting 【H】 and 【F】 You only need to set 【E】 (several types of coins) and 【P】 (the pulse of each type of coin). Refer to (Step Two) after setting is complete However, when inserting the sample coins, you need to insert 15 coins. (Of course, you can use more than five coins consecutively to light up a row of LEDs one after another, and then insert the next type of coin) |
|
4 |
Only set one coin, cycle the same setting
twice, coin sampling method, two-stage coin is the same coin |
|
5 |
Then press the button "Add button
(10)" or " decrease button (11)" on both sides of the display
(9), such as 1 type, press [Add button (10)] once, it will display 1 |
|
6 |
Then,
press the button on the left of the "LED Light (7)" button (8) |
|
Note:
if 【E】 is set, 【P】
(output pulse count) will be displayed This mode does not require setting 【H】 and 【F】 You just
need to set 【E】(several types of coins) and
【P】(the pulse of each type of coin). |
|
|
-------【H】 |
|
|
7 |
[H1]
will be displayed. [How many coins are input when
the number of coins is sampled] generally, at least 5 samples for various
coins are prepared. |
|
8 |
Press the button " Add button
(10)" or " decrease button (11)" on both sides of the display
(9), for example, 5, press [plus (10)] 5 times, it will display 5 |
|
9 |
Then, press the button (8)on the left of
the "LED Light (7)" |
|
-------【P】 |
|
|
10 |
[P1] will be displayed, (the number of
output pulses for one coin) |
|
11 |
If there are only 50 cents, 25 cents are
two, 50 cents is set to 2, 25 cents is set to 1, that
is, 25 cents is the base. |
|
12 |
Then, press the button (8)on the left of
the "LED Light (7)" |
|
-------【F】 F=screening the sensitivity of the coin |
|
|
13 |
[F1] will be displayed, setting 8 will be
fine |
|
14 |
Then, press the button (8)on the left of
the "LED Light (7)" |
|
15 |
Then
[H2] will be displayed, repeat steps 5 to 14. |
|
16 |
Until the display shows (0) |
|
17 |
Very important,
(unplug the coin feeder, plug it in, or restart the coin box) |
|
Second step:Follow the "Set Coin Sampling
Method" sequence |
|
|
1 |
Press once, the button (8) on the left of
the LED light (7) will display "A" |
|
2 |
Press again, the button (8) on the left of
the LED (7) will display "A1" |
|
3 |
After the amount of the first sampled coin
is completed (you can continue to deposit coins in the order you just set) |
|
4 |
Will display "A2" [Set more than
one coin will display A2, A3..] |
|
5 |
Repeat steps 3~4 |
|
6 |
This part is completed until 0 is
displayed. |
|
7 |
Very important,
(unplug the coin feeder, plug it in, or restart the coin box) |
|
8 |
Start
putting coin test |
|
9 |
When testing the coin, if the coin will
exit from the front, repeat the first step to start setting |